
Old Bronze Portlights: Sealing the Pane
Here’s another useful article from The Resourceful Sailor series, in which we discover how Joshua Wheeler took apart and resealed his boat’s leaky portlights.
The windowpane seals and gaskets on the opening portlights of Sampaguita, my 1985 Pacific Seacraft Flicka 20, were showing age. A few were seeping around the panes. At first, it was daunting to consider taking these oval, bronze portlights apart. They keep the Pacific Northwest rains out of the boat. However, a stitch in time saves nine.
Research did not turn up precise how-to instructions, but helped narrow my options. Pacific Seacraft has a service to rebuild them at around $335 each, plus shipping and tax. With their expertise, I suspect they do an outstanding job. Or, I could take a chance on myself, order supplies for around $150 to refit all six, invest the sweat equity, and learn something in the process. Since you are reading this, you know I chose the latter. In my case, the seals between the frames and the cabin top were still good, so this focuses only on the opening, hinged portlights. It was a discovery process, and I was uncertain what I would find, so I removed and rebuilt one portlight at a time.

Detaching them from the frames was intuitive and fast. I then placed the portlight on my workspace, outer gasket up. This gasket formed the watertight seal with the frame, and its removal was required to access the pane inside. It also destroyed it.
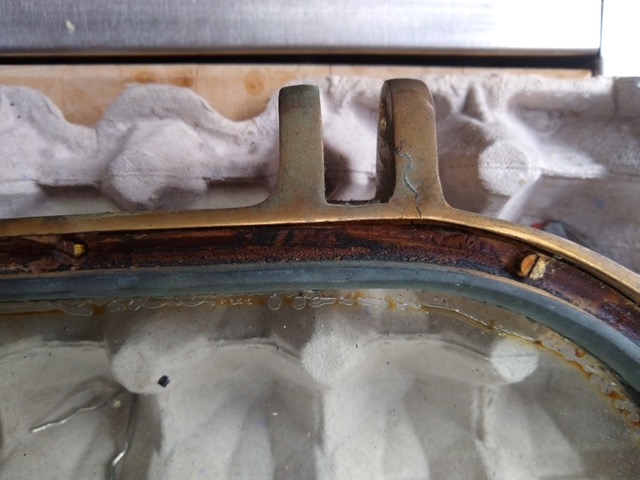
These screws were 4-32 x 1/4 inch or 4-32 x 3/8 inch. What I found was a mix, though the 3/8-inch rarely fit well. I removed these. A bedding compound was used under the retainer to seal the windowpane in the portlight. My ring and pane either popped right out or required prying, or a fine blade, to break the seal.
With the pane removed, I used acetone, a box knife, a razor blade, a screwdriver, sandpaper, time, and elbow grease to clean all the surfaces.
I chose a black silicone-polyurethane hybrid for the new sealant, banking on compression more than adhesion to seal the panes. I liberally added this to the pane’s frame, gently laid the glass in, added more sealant on top, filling in any spaces, and put the retaining ring in place. Using new 1/4-inch brass screws, unless 3/8-inch fit properly, I started their threading, careful not to squeeze out all the sealant, and leaving room to tighten them later. I let this cure for at least 24 hours, then drove in all the screws and trimmed away the excess sealant on both sides of the pane.
Unable to source outer gaskets, I did find 3/8-inch square silicone rubber bar stock. I cut it to fit the retaining ring, using a jig to trim the ends at 45-degree angles, creating a scarf joint for a better seal. Using the same hybrid sealant, I bedded the ring, focusing on the bottom and inside edges, then laid the rubber bar in, sealing in the scarf joint on the top of the portlight.
I immediately reinstalled the porthole in the frame, using the Allen-wrench adjustments to ensure a square fit and compression. I used rags to clean any sealant that was squeezed out on both sides and let it cure. After a couple of days, I used pressurized water to test the seals. I was fortunate enough not to have any leakers.

If you take on this project, there are some aesthetics to consider. Sampaguita appears to have the original two-pane safety glass windows. Mine had some cloudiness around the edges from moisture ingress. I researched the replacement of these with new glass or acrylic but ultimately decided to reuse the old ones. Next, if you like bright and shiny, the bronze frames and portholes could be polished more easily when disassembled. Also, the silicone bar stock that my source offered came only in red. Black may be available from a different vendor.
As with most boat projects, expect complications. If your panes have been leaking for a while, the brass screws holding the retaining ring may have dezincified. Of my six portholes, two panes had this issue with the lowest two screws. Three out of four, the heads came off, but I was able to use penetrating oil and pliers to remove the shafts. The fourth was more of a production as it broke off inside the frame and required me to drill it out, and later, re-tap the hole to a 5-40 size. The larger screw also meant some machining to the retaining ring and the screw itself to ensure a good fit. That one fastener was the most complicated part of the whole job. Also, the tedious chore of cleaning the surfaces will depend on the sealing compounds used previously. Mine had a couple of different materials and tenacities.
As a sailor and not a professional shipwright, I am not an authority on how best to repair these portlights. I felt capable of doing the job, and it was apparent the savings on labor would be significant. As with many things, the fear of the unknown is often the biggest block. I’m hoping this will remove some of the mystery of the job for those courageous enough to give it a go. For boaters who want to have big adventures with small budgets, The Resourceful Sailor presents insight on how that might be possible. Remember, keep your solutions prudent and safe, and have a blast.
Great job. What was the average time spent per portlight (roughly) including the time spent on the difficult ones? Being that I have 10 of them and that would be pushing $4000 to have PSC do the job, and they all appear to have original seals (from 1991) I suppose I should start doing a few every now and then, even though they only leak when I forget to close them tight.
Tiemo, thanks for reading. It is difficult to say just how long as the project stretched on for a few months. My approach was to treat each port as its own project, I wasn’t pressed due to leaking, and my work space was less than ideal. I would say each port took a couple hours each on average. So much depends on corrosion and adhesive removal. I’ve met people who have used flax packing for gaskets too, which would eliminate some of the adhesive removal when changing them out. I can’t speak on the effectiveness of this as a gasket material.
I found this – WEFCO Square Hollow Rubber Gasket – 5/16″ – at Defender. Very similar to the old gasket in my Luders 33.